Tag Archives: android app development

Change Icon Of Android App In Android Studio

In this article, I will show you how to change the Android application icon using Android Studio. Icons are part of the graphical user Interface of the mobile application. In android studio there is a default icon set by android studio itself. You can change it as per your application requirement.


Changing the Application Icon In Android Studio:

Step 1- Open your application in Android Studio.
Step 2- Further follow the path to reach the desired folder to add icon i.e. app -> res-> mipmap.

1

Step 3- Here add you app icon. You can just simply copy and paste the image in mipmap folder.
Step 4- After placing the image in the mipmap folder. You need to rename the default icon name to your icon image name.
Step 5- Go to  app -> manifests open AndroidManifest.xml file. Here find the following code.
android:icon=”@mipmap/ic_launcher
Here ic_launcher is the default image name, rename it.

2

Also read: Creating an App Icon with the Asset Studio

Learn Android Programming – For Beginners To Pro

Android is the most popular open source operating system for mobile devices like Smartphone and Tablet. This OS is based on Linux kernel which is currently developed by Google. At Google I/O 2014, it was revealed that more than one billion per month people actively uses Android. As of July 2015, Statista revealed Google play is the largest mobile App store which has over 1.6 million Apps and billions of application gets downloaded every year. Android programming is based on Java programming language so if you have basic understanding on Java programming then it will be a fun to learn Android application development.


Prerequisite For Android Programming:

Before you begin Android programming below are the prerequisite needed:

JAVA:

Android programming is mostly done in JAVA language. So before you begin Android programming you must be comfortable with JAVA and OOPS concepts. If you are new to Android we recommend you to check out our JAVA for Android developer section where we have shared in-depth tutorial on JAVA.

XML:

Once you are done with JAVA the next thing you need is basic knowledge of XML for designing UI of Android App. Even though Android Studio has drag and drop for designing UI but still you will need to learn XML if you want your UI is highly user interactive. You can check out Design Android User Interface section to learn it.


Android Programming Tutorials:

Below are the list of Android programming topics. Follow the link to read full tutorial:

Topics (Follow the link to read tutorial) Description
Activity Lifecycle Learn about Android Activity lifecycle like created, started, resumed, paused, stopped or destroyed.
Intent Learn how Intent is used for communicating between the components of an Application and from one app to another
Shared Preference Learn how primitive data is saved on Android device based on key-value pair
JSON Parsing JSON stands for JavaScript Object Notation. It is structured, light weight, human readable and easy to parse. It’s a best alternative to XML when our android app needs to interchange data from server.
Toast & Custom Toast In Android, Toast is used to display information for a period of time. It contains a message to be displayed quickly and disappears after specified period of time.
Internal Storage In this tutorial we are going to learn about internal storage of data/files in Android App using example or you can say the primary memory of your phone.
External Storage In this tutorial we gonna study about storage of data/files in android external storage or you can say the secondary memory/SD card of your phone.
Sqlite SQLite is a Structure query base database, open source, light weight, no network access and standalone database. Android has built in SQLite database implementation.
AsyncTask In Android, AsyncTask (Asynchronous Task) allows us to run the instruction in the background and then synchronize again with our main thread.
Splash Screen Splash Screen is most commonly the first startup screen which appears when App is opened.
Volley Volley is a HTTP library developed by Google and was first introduced during Google I/O 2013. This library is used to transmit data over the network.
Retrofit Retrofit is a simple network library that used for network transactions. By using this library we can seamlessly capture JSON response from web service/web API.

 Android Material Design Tutorials With Examples

Android UI, Layout & Material Design Tutorial, With Examples

Creating an Android Virtual Device (AVD) in Android Studio

Android Material Design Tutorials With Examples

Capture

Material Design is a design language created for Google Android’s new OS which was announced in Summer 2014.  Since then it has become popular in designing and developing Android Apps. As per Google this language is based on paper and ink.

Android provides the following elements for you to build material design apps:

  • A new theme
  • New widgets for complex views
  • New APIs for custom shadows and animations

Here our in-depth tutorial will teach how to design beautiful and user friendly Application using Android Material Design. All our tutorial will have practical example and step by step explanation of each topic.


Prequisites For Leaning Android Material Design:

JAVA For Android Developer:

JAVA is a programming language which is most commonly used in Android App Development. Before you start learning Material Design you will need to learn Object Oriented Java. Check out our JAVA for Android Developer section to learn it.

Android UI Basics:

You will also need to be familiar with Android UI basics.

Android Studio:

Android Studio is the official IDE (integrated development environment) for developing Android Apps by Google. It is available for free download on Windows, Mac OS X and Linux.

Check out our Android Studio guide to get started with it.


Android Material Design Tutorials:

Below are the list of Material design topics. Follow the link to read full tutorial:

 
Topics (Follow the link to read tutorial) Description
TextInputLayout / Floating Labels in EditText TextInputLayout is a new element introduced in Design Support library to display the floating label in EditText.
TabLayout TabLayout provides horizontal layout to display tabs on the screen. We can display more screens in a single screen using tabs.
NavigationDrawer Navigation drawer is a side menu that helps us to organise the navigation inside our app. It is a uniform way to access different pages and information inside our app.
PercentRelativeLayout PercentRelativeLayout in Android is a subclass of RelativeLayout that supports percentage based margin and dimensions for Views(Button, TextView or any other view).
Toolbar In Android Toolbar is similar to an ActionBar(now called as App Bars). It is a Viewgroup that can be placed at anywhere in the Layout. We can easily replace an ActionBar with Toolbar.
PercentFrameLayout In Android PercentFrameLayout is a subclass of FrameLayout that supports percentage based margin and dimensions for Views(Button, TextView or any other view).
RecyclerView As ListView The RecyclerView is more flexible, powerful and a major enhancement over ListView.
RecyclerView As GridView The RecyclerView is more flexible, powerful and a major enhancement over GridView.
RecyclerView As StaggeredGrid It is used to show the items in staggered Grid (varying size)
CardView In Android, CardView is another main element that can represent the information in a card manner with a drop shadow called elevation and corner radius which looks consistent across the platform.
Pull To Refresh / SwipeRefreshLayout In Android App Pull To Refresh aka SwipeRefreshLayout is used whenever we need to refresh the content’s of a view via a vertical swipe gesture.
ViewPager ViewPager in Android is a class that allows the user to flip left and right through pages of data. This class provides the functionality to flip pages in app.
Animation The Animations Framework allows us to create visually attractive animations and transitions in our apps.

Creating an Android Virtual Device (AVD) in Android Studio

An Android Virtual Device (AVD) is a configuration that defines the characteristics of an Android phone, tablet, Android Wear, or Android TV device that you want to simulate in the Android Emulator. Before debugging and testing android application, you should create an android virtual device ( AVD ) to start a simulator. You can specify special configurations for your avd, and then start it for debugging and executing applications.

To create a new AVD, do one of the following:

  • Select Tools > Android > AVD Manager.
  • Click AVD Manager AVD Manager icon in the toolbar.

Both will Open the AVD Manager shown in figure below:

1

OR

2

Android Virtual Device Manager will be opened. After that Click on Create Virtual Device.

3

Now choose the Category, phone size and choose the pixels according to your requirement. After this click on Next button.

4

After that choose the SDK Version and Click on Next button. If you have various SDK Versions like Kitkat, Lolipop ,Marshmallow,Nougat and Oreo etc in your SDK then you can select one of them. Here we choose Nougat SDK Version. Click on the next.

5

After that Enter the AVD Name in Android Virtual Device and Click on Finish button. Here you can do customization to AVD which you are creating as per your requirement.

Click Finish and new AVD is created. To start it, click the green triangle button in AVD list Actions column. To edit it’s settings, click the green pencil button.

6

AVD will start in Emulator. Now you can run your App in this AVD.

emulator2

I hope you find this blog post very helpful while creating AVD in Android Studio. Let me know in a comment if you have any questions regarding Android Studio. I will reply you ASAP.


Add a new activity to an existing project in Android Studio

Step 1: Firstly, right-click the app folder and select New > Activity  and choose your Activity as per requirement. Here I choose Login Activity as shown in figure below.

1

Step 2: After that Customize the Activity in Android Studio. Enter the “Activity Name”, “Layout Name”, “Title” ,”Hierarchical Parent”, “Package name”,”Source Language” and “Target Source Set ” in the Text box and Click on Finish button.

Note: Default configuration works fine.

All steps are shown in figure in below:

2

To configure Hierarchical parent click on right three doted  button. Here I choose MainActivity but you can choose as your requirement.

3

If you want to write program in kotlin click Source Language and set to kotlin. Default source language  is Java in android Studio 3.

4

5

To set Target Source Set click on target source set It will show three option.By default it set to main in android studio 3.

6

Step 3: After that your new Activity in Layout will be created. Your XML Code is in Text and your Design Output is in Design. See below figure.

7


Close, Save and Open Recent project in Android Studio

Open Project in Android Studio

Create/Start New Project In Android Studio

Objective:

The main objective of this tutorial is how to create a new project in Android Studio. And this tutorial is for those who are new to Android Studio.

To create a new project perform the following steps:

Step 1: Start and configure the project:

Firstly, open the Android Studio. You will see “Welcome to Android Studio” on your computer screen. After that you click on “Start a new Android Studio project”.

ff

If you do have a project opened, click File > New > New Project.

aa

After that you will see “Create Android Project” on your computer screen. Here enter the “Application name” , the “Company Domain” ( Company domain is used to uniquely identify the App. So two App with same Application name will have different company domain. e.g. I used here “sanikamal.ruatech.com”)and the project location in the text box and then Click Next button. If you want to use C++ and/or Kotlin code in your project, check the corresponding checkboxes to set up your project accordingly. You can always add C++ code and add Kotlin code later.

ffg

Step 2: Select form factors and API level:

After that you will see “Target Android Devices” on your computer screen and select the form factors your app will be run on. Select “Phone and Tablet” field and enter the “Minimum SDK” in the text box and then Click Next button. When you select Minimum SDK, Android studio will give you some active android devices percentage that will support your android application. Otherwise, you can also click on “Help me choose” button for more information about android platform versions.

ggg

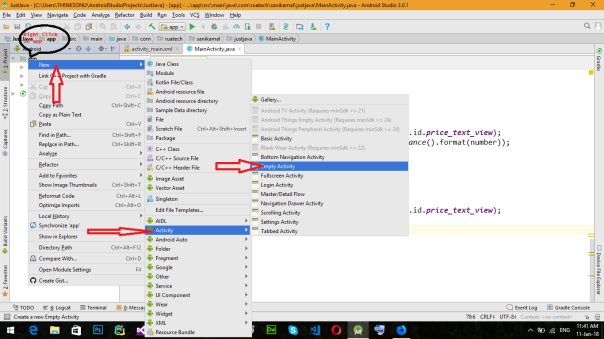
Step 3: Add an activity:

This screen suggests you “Add an Activity to Mobile” first. If you don’t want to add any activity at starting, you can select Add no activity option. We selected Empty Activity.

If you have selected Phone and Tablet in option in the last screen then it will display the only phone related suggestions.

For example, select Google Maps Activity for google map project, Login Activity for User Login project etc.

bbbbb

Step 4: Configure your activity:

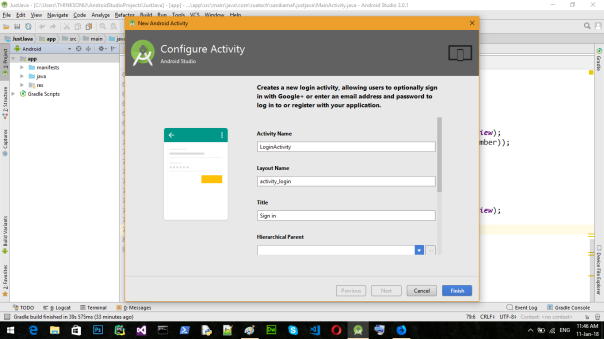
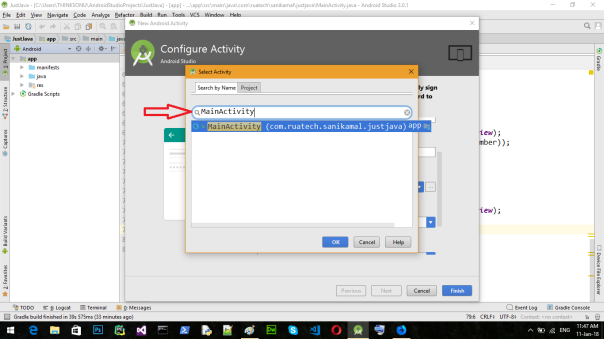
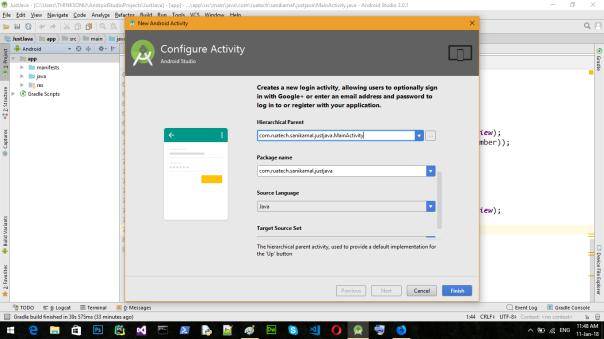
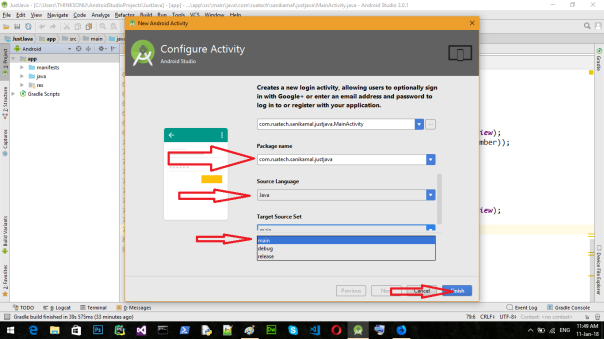
Here, you can customize your selected activity. You can change your Activity name from here. Enter the “Activity Name” in the text box and enter the “Layout Name” in the text box and then Click Finish button.

Activity Name Name of JAVA file for programming

Layout Name Name of XML file for designing UI

swsw

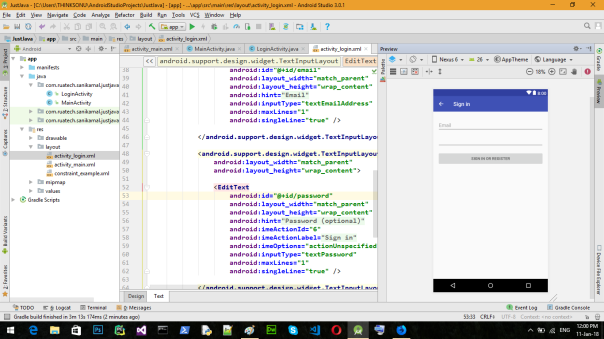
Android Studio now sets up your project and opens the IDE.

fgggjh

I hope you find this blog post very helpful while creating Android Project in Android Studio. Let me know in a comment if you have any questions regarding Android Studio. I will reply you ASAP.


Android Studio Tutorial For Beginners

android-studio-logo-840x359.pngAndroid Studio Introduction

Android Studio is the official IDE (integrated development environment) for developing Android Apps by Google. It is purpose built for Android to accelerate your development and help you build the highest-quality apps for every Android device. It is based on  JetBrains’ IntelliJ IDEA software and has lots of amazing features which helps developer in creating Android App.

Android Studio is available for free download on Windows, Mac OS X and Linux.

Prerequisites For Learning Android Studio:

There are two prerequisites for learning Android Studio tips:

System Requirements:

First your system OS must be either Windows, Max OS X or Linux with below requirement:

Windows

  • Microsoft® Windows® 7/8/10 (32- or 64-bit)
  • 3 GB RAM minimum, 8 GB RAM recommended; plus 1 GB for the Android Emulator
  • 2 GB of available disk space minimum,
    4 GB Recommended (500 MB for IDE + 1.5 GB for Android SDK and emulator system image)
  • 1280 x 800 minimum screen resolution

Mac

  • Mac® OS X® 10.10 (Yosemite) or higher, up to 10.13 (macOS High Sierra)
  • 3 GB RAM minimum, 8 GB RAM recommended; plus 1 GB for the Android Emulator
  • 2 GB of available disk space minimum,
    4 GB Recommended (500 MB for IDE + 1.5 GB for Android SDK and emulator system image)
  • 1280 x 800 minimum screen resolution

Linux

  • GNOME or KDE desktopTested on Ubuntu® 14.04 LTS, Trusty Tahr (64-bit distribution capable of running 32-bit applications)
  • 64-bit distribution capable of running 32-bit applications
  • GNU C Library (glibc) 2.19 or later
  • 3 GB RAM minimum, 8 GB RAM recommended; plus 1 GB for the Android Emulator
  • 2 GB of available disk space minimum,
    4 GB Recommended (500 MB for IDE + 1.5 GB for Android SDK and emulator system image)
  • 1280 x 800 minimum screen resolution


Android Studio:

The second thing you need is to download Android Studio on your system and install it. It is available for free download on Windows, Mac OS X and Linux OS.


Eclipse Vs Android Studio

Android App Development is mostly done in two IDE i.e. Eclipse and Android Studio. Earlier Eclipse was the popular IDE but now Android Studio has taken over it. This is because Google has ended the support for Eclipse and now only focused on Android Studio. Google also recommended developer to import their Android projects into Android studio and use Android Studio.

Android Studio Tutorials For Beginners:

Below are the tutorials links on Android Studio:

  • Create New Project – Learn how to start/create a new project in Android Studio
  • Open Project – Learn how to open projects in Android Studio.
  • Close, Save and Open Recent Project – Learn more about how to open saved projects and close current project in Android Studio.
  • Create New Activity – Learn to create New Activity in Android Studio .
  • Create New Java Class -Learn how to create New Java Class in Android Studio.
  • Create Virtual Device – Learn how to create a new AVD  in Emulator.
  • Run App in Emulator – Learn how to run and test Android App in Emulator.
  • Run/Test App in Real Device – Learn how to run app in real device.
  • Create Drawable Resource XML File – Learn how to create drawable resource XML file in Android Studio.
  • Add/Create Landscape Layout – Learn to design app in Landscape orientation in Android Studio.
  • Create Local HTML File – Learn how to create local HTML file in Android Studio.
  • Create Raw Folder – Learn how to create Raw Folder in Android Studio.
  • Add/Create Assets Folder – Learn how to create Assets folder in Android Studio.
  • Install Genymotion Emulator – Howt to install Genymotion Emulator in Android Studio.
  • Import/Add External JAR File – Learn how to import an External JAR file to Android Studio.
  • Change API SDK Level – Learn how to change the SDK level of API in Android Studio.
  • Create/Add New Package Inside Src Folder – Learn how creating new package inside Src Folder in Android Studio.
  • Creating Folders for Adding Different Resolution Images – Learn how add folder for adding images with different resolution in Android Studio.
  • Create An Interface – Learn how to create Interface in Android Studio.
  • Add Image to Drawable Folder in Android Studio – Learn Steps to add image to Drawable Folder in Android Studio.
  • Change Icon Of Your Android App – Learn how to change the android app icon in Android Studio.
  • Add Audio To Android App – How to  add audio to your Android application.
  • Application Launcher Icon Size – Learn about different application launcher icon sizes in android studio.
  • Basic Activity In Android Studio –Learn about how to create a basic activity in android studio.
  • Implement Abstract Method – Learn about how to implement abstract methods on clicks or using shortcuts in android studio.
  • Change Package Name In Android Studio – How to rename/change package name in Android Studio
  • Generate Signed Apk In Android Studio For Publishing & Updating Application.
  • How To Publish Android App On PlayStore – Learn how to publish your first Android App on Play store.
  • How To Create Anim Folder & Animation File In Android Studio –Steps to create an anim folder in Android Studio to store animation file under the resource folder of our application.