Category Archives: Android Studio

Creating an App Icon with the Asset Studio

In this article, I will show you how to create the Android application icon with Assets Studio  in Android Studio. If you right-click over pretty much any directory in the Android Studio tree, the context menu will have an “Image Asset” option.

3.png

By default, the Asset Studio has its “Icon Type” drop-down set for “Launcher Icons(Adaptive and Legacy)”, “Lancher Icons(Legacy Only)”, “Action Bar and Tab Icons” and “Notification Icon”. The overall name for launcher icon is found in the Name field, above the tabs. The default is ic_launcher.

4

Create adaptive and legacy launcher icons


Note: If your app supports versions no higher than Android 7.1, follow the instructions to create a legacy launcher icon only instead.

After you open Image Asset Studio, you can add adaptive and legacy icons by following these steps:

  1. In the Icon Type field, select Launcher Icons (Adaptive & Legacy).
  2. In the Foreground Layer tab, select an Asset Type, and then specify the asset in the field underneath:
    • Select Image to specify the path for an image file.
    • Select Clip Art to specify an image from the material design icon set.
    • Select Text to specify a text string and select a font.
  3. In the Background Layer tab, select an Asset Type, and then specify the asset in the field underneath. You can either select a color or specify an image to use as the background layer.
  4. In the Legacy tab, review the default settings and confirm you want to generate legacy, round, and Google Play Store icons.
  5. Optionally change the name and display settings for each of the Foreground Layer and Background Layer tabs:
    • Name – If you don’t want to use the default name, type a new name. If that resource name already exists in the project, as indicated by an error at the bottom of the wizard, it’s overwritten. The name can contain lowercase characters, underscores, and digits only.
    • Trim – To adjust the margin between the icon graphic and border in the source asset, select Yes. This operation removes transparent space, while preserving the aspect ratio. To leave the source asset unchanged, select No.
    • Color – To change the color for a Clip Art or Text icon, click the field. In the Select Color dialog, specify a color and then click Choose. The new value appears in the field.
    • Resize – Use the slider to specify a scaling factor in percent to resize an Image, Clip Art, or Text icon. This control is disabled for the background layer when you specify a Color asset type.
  6. Click Next.
  7. Optionally, change the resource directory: Select the resource source set where you want to add the image asset: src/main/res, src/debug/res, src/release/res, or a custom source set.
  8. Click Finish. Image Asset Studio adds the images to the mipmap folders for the different densities.(Note Above description is taken from android studio documentation)

See below figure where I create a Text icon using Assets Studio.

5.png

NOTE: Same way we can create legacy launcher icon ,Action bar and tab icons and Notification icons.


Change Icon Of Android App In Android Studio

In this article, I will show you how to change the Android application icon using Android Studio. Icons are part of the graphical user Interface of the mobile application. In android studio there is a default icon set by android studio itself. You can change it as per your application requirement.


Changing the Application Icon In Android Studio:

Step 1- Open your application in Android Studio.
Step 2- Further follow the path to reach the desired folder to add icon i.e. app -> res-> mipmap.

1

Step 3- Here add you app icon. You can just simply copy and paste the image in mipmap folder.
Step 4- After placing the image in the mipmap folder. You need to rename the default icon name to your icon image name.
Step 5- Go to  app -> manifests open AndroidManifest.xml file. Here find the following code.
android:icon=”@mipmap/ic_launcher
Here ic_launcher is the default image name, rename it.

2

Also read: Creating an App Icon with the Asset Studio

Add Audio To App In Android Studio

Adding audio clip to android application is a simple task as it also add some further functionality. Here is a step by step tutorial how to add audio file and how to play music when App will start.


Adding Audio to app in Android Studio:

Step 1: Open the android studio with the project in which you want to add-on audio clip/media file.
Step 2: Create a raw folder.
Step 3: Add media file to raw folder by simply copy and paste that to raw folder.
3
Step 4: Here we added a media file “color_black.mp3” . Now open the Java File of desired activity, here we are adding audio in MainActivity.
Step 5: Further add this code

MediaPlayer mediaPlayer= MediaPlayer.create(MainActivity.this,R.raw.color_black);
        mediaPlayer.start();

Step 6: Now run the App and your music will play when App will start.

Create/Add Raw Folder In Android Studio

Raw folder in Android is used to keep mp3 or ogg audio files and also video files. The raw folder is created inside \app\src\main\res\raw. So we will simply create it inside res folder. Here is the simple way to create raw folder in android studio:


How To Create/Add Raw Folder In Android Studio

Step 1: Open App folder and select res folder

Step 2: Right click on res folder, select New> Android resource directory, then studio will open a dialog box and it will ask you to enter the name.

1

Step 3: Write “raw” and selectResource type” then click OK. Open res folder and you will find your raw folder under it.

2


Next Step: How To Add & Play Audio File In Raw Folder

JAVA For Android Developer– Tutorial, Examples, And Programs

Android UI, Layout & Material Design Tutorial, With Examples

hhh

All user interface elements in an Android app are built using View and ViewGroup objects. A View is an object that draws something on the screen that the user can interact with. A ViewGroup is an object that holds other View (and ViewGroup ) objects in order to define the layout of the interface. Android UI designing can be done either in XML or programmatically in application. But the Android UI designer mostly prefer XML for defining UI because it separate the presentation from the code and makes easier to visualize, manage, edit and debug the App.

Here our in depth tutorial will teach you Android UI designing step by step starting with XML basic, layout, widgets and attributes with examples. Following it you will learn different UI Design techniques, patterns & principles and finally we will show you lots of examples where we will discuss designing of different Apps from scratch to finish.


Prerequisites For Designing Android User Interface:

Android Studio And SDK:

Android Studio is the official IDE for developing Android App created by Google. It has a very simple layout editor which support drag and drop for designing UI where one can drag layout, widgets, text fields etc. and drop it on the Virtual mobile screen to design Android UI. It also has the properties option where one can easily fill attribute like color, text etc to give attractive and pretty look to UI. The Studio also has Text option where one can see the XML code of the UI and edit it.

If you are new to it then check our Android Studio guide


Android Designing Tutorial:

New to Android UI? Begin from here.

Basics of XML In Android

Layout in Android:

Layout – Layout are used to define the actual User interface of application. It holds all the elements (i.e. views) or the tools that we want to use in application. For example, ImageView, Button,TextView and other UI elements.

Types Of Layout And Few Important ViewGroup In Android

  1. Linear Layout
  2. Relative Layout
  3. Table Layout
  4. FrameLayout
  5. Absolute Layout
  6. ConstraintLayout

  7. WebView

  8. ListView
  9. GridView
  10. Recycler View

Also Read: Nested Layout in Android

Adapter In Android:

Adapter – Adapter acts as a bridge between UI component and data source that helps us to fill data in UI component. It holds the data and send the data to an Adapter view then view can takes the data from the adapter view and shows the data on different views like as ListView, GridView, Spinner etc.

Different types of Adapter in Android:

  1. BaseAdapter
  2. SimpleAdapter
  3. Custom SimpleAdapter
  4. ArrayAdapter

Important Android UI Tutorials

List of all  Android UI tutorials

Also Read:

1. UI for Multiple Screens.

2. Responsive UI with ConstraintLayout.

3. Adding App Bar.

4. Showing pop up messages.

5. Creating custom layout.

6. Creating Backward-Compatible User Interface.

7. Implementing Accessibility.

8. Managing the System User Interface.

9. Creating Apps with Material Design.

 
Topics (Follow the link to read tutorial) Description
ListView It helps in displaying the data in the form of a scrollable list.
GridView It display items in two dimensional scrolling grid (rows and columns), the grid items are not necessarily predetermined but they are automatically inserted to the layout using a ListAdapter.
ScrollView And Horizontal ScrollView It is used to scroll the items in vertical direction and Horizontal ScrollView scroll the items in horizontal direction
Spinner Spinner provides a quick way to select one value from a set of values. Android spinners are nothing but the drop down-list seen in other programming languages.
Custom Spinner When we want to display a spinner item with image, text etc
TextView It display text to the user
EditText It provide an input or text field where user can enter something like his name details, phone number etc
Button It is a push button which can be clicked, or pressed by the user to perform an action
ImageView It is used to display an image file in application
ImageButton It is used to display a normal button with a custom image in a button
CheckBox It is a type of two state button either unchecked or checked in Android.
Switch It is off/on button which indicate the current state of Switch. It is commonly used in selecting on/off in Sound, Bluetooth, WiFi etc.
RadioButton And RadioGroup In Android, RadioButton are mainly used together in a RadioGroup. In RadioGroup checking the one radiobutton out of several radio button added in it will automatically unchecked all the others.
RatingBar It is used to get the rating from the app user.
WebView It is a view which is used to display the web pages in application.
AutoCompleteTextView It is a view i.e similar to EditText, except that it displays a list of completion suggestions automatically while the user is typing.
MultiAutoCompleteTextView MultiAutoCompleteTextView is similar to AutoCompleteTextView except that it can hold multiple string words value at single time
ProgressBar It is used to display the status of work being done like analyzing status of work or downloading a file etc.
Timepicker It is a widget used for selecting the time of the day in either AM/PM mode or 24 hours mode
DatePicker It is a widget used to select a date by day, month and year
Calendar View It is used for displaying Calendar and selecting dates
AnalogClock, DigitalClock And TextClock AnalogClock is a two handed clock one for hour indicator and the other for minute indicator and DigitalClock & TextClock both looks like your normal digital watch on hand which displays the hours minutes and seconds in digital format
SeekBar It is an extension of ProgressBar that adds a draggable thumb, a user can touch the thumb and drag left or right to set the value for current progress
ExpandableListView It is a View that shows items in a vertically scrolling two level list
Chronometer It implements a simple timer
ZoomControls It display simple set of controls that is used for zooming and provides callback to register for events
CheckedTextView It is an extension of normal TextView that supports the checkable interface and displays it
VideoView It is used to display a video file
TabHost It is a Container for tabbed window view. Whenever we need to enter or display a lot of information in one activity. A simple and effective method is to use tabs in your interface form which is done using TabHost in Android.
SearchView It provide search user interface where users can enter a search query and then submit a request to search provider
SlidingDrawer It is used to hide the content out of the screen and allows the user to drag a handle to bring the content on screen
TextSwitcher It is used to animate a label(i.e. text) on screen
ViewSwitcher It is used for switching between views which can hold only two child views for switching
ViewFlipper ViewSwitcher can hold only two child views but ViewFlipper can holds two or more child views and show one at a time
ViewStub It is a zero sized invisible View that can be used to lazily inflate layout resource at runtime
Gallery It is a view used to show items in a center locked, horizontally scrolling list and user will select a view and then user selected view will be shown in the center of the Horizontal list
CountDownTimer CountDownTimer in Android is used to set a countdown based on interval set by you and it will stop when the time has come in future.
Alert Dialog Alert Dialog in an android UI prompts a small window to make decision on mobile screen. Sometimes before making a decision it is required to give an alert to the user without moving to next activity.
ProgressDialog Android Progress Dialog is a UI which shows the progress of a task like you want user to wait until the previous lined up task is completed and for that purpose you can use progress dialog.
HTML in Android In Android, many times while designing an application we might be in a situation where we would like to use HTML content and display in our App screen. It may be to display some static content like help, support, FAQ and others pages.
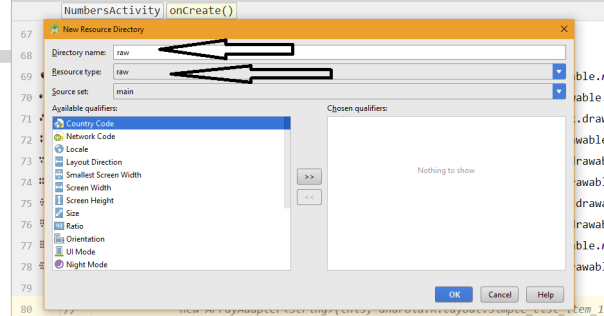
Creating an Android Virtual Device (AVD) in Android Studio

An Android Virtual Device (AVD) is a configuration that defines the characteristics of an Android phone, tablet, Android Wear, or Android TV device that you want to simulate in the Android Emulator. Before debugging and testing android application, you should create an android virtual device ( AVD ) to start a simulator. You can specify special configurations for your avd, and then start it for debugging and executing applications.

To create a new AVD, do one of the following:

  • Select Tools > Android > AVD Manager.
  • Click AVD Manager AVD Manager icon in the toolbar.

Both will Open the AVD Manager shown in figure below:

1

OR

2

Android Virtual Device Manager will be opened. After that Click on Create Virtual Device.

3

Now choose the Category, phone size and choose the pixels according to your requirement. After this click on Next button.

4

After that choose the SDK Version and Click on Next button. If you have various SDK Versions like Kitkat, Lolipop ,Marshmallow,Nougat and Oreo etc in your SDK then you can select one of them. Here we choose Nougat SDK Version. Click on the next.

5

After that Enter the AVD Name in Android Virtual Device and Click on Finish button. Here you can do customization to AVD which you are creating as per your requirement.

Click Finish and new AVD is created. To start it, click the green triangle button in AVD list Actions column. To edit it’s settings, click the green pencil button.

6

AVD will start in Emulator. Now you can run your App in this AVD.

emulator2

I hope you find this blog post very helpful while creating AVD in Android Studio. Let me know in a comment if you have any questions regarding Android Studio. I will reply you ASAP.


Add/Create New Java Class in Android Studio

What is Java Class ?

A class is nothing but a blueprint or a template for creating different objects which defines its properties and behaviors. Java class objects exhibit the properties and behaviors defined by its class. A class can contain fields and methods to describe the behavior of an object.

Android Studio helps you to quickly create the following new classes and types:

  • Java classes
  • Enumeration and singleton classes
  • Interface and annotation types

Step 1:  Firstly, Select app > Java > package > Right Click on package. After that Click on New > Java Class.

1

Step 2: After that Enter Class name and Click on OK. Here we create Class Bird as shown in figure below. Remember to choose your package in which you want to create new class. There are many options available fill as your requirement.

2

New Java Class will be created in your Android project.

3


I hope you find this blog post very helpful while creating Android Project in Android Studio. Let me know in a comment if you have any questions regarding Android Studio. I will reply you ASAP.

Add a new activity to an existing project in Android Studio

Step 1: Firstly, right-click the app folder and select New > Activity  and choose your Activity as per requirement. Here I choose Login Activity as shown in figure below.

1

Step 2: After that Customize the Activity in Android Studio. Enter the “Activity Name”, “Layout Name”, “Title” ,”Hierarchical Parent”, “Package name”,”Source Language” and “Target Source Set ” in the Text box and Click on Finish button.

Note: Default configuration works fine.

All steps are shown in figure in below:

2

To configure Hierarchical parent click on right three doted  button. Here I choose MainActivity but you can choose as your requirement.

3

If you want to write program in kotlin click Source Language and set to kotlin. Default source language  is Java in android Studio 3.

4

5

To set Target Source Set click on target source set It will show three option.By default it set to main in android studio 3.

6

Step 3: After that your new Activity in Layout will be created. Your XML Code is in Text and your Design Output is in Design. See below figure.

7


Close, Save and Open Recent project in Android Studio

Open Project in Android Studio

Close, Save and Open Recent project in Android Studio

When the project is already opened in android studio and the same time you want to open another project  in android studio then use the File>> Open Recent. When the project work is done in android studio to close  project use the File>>Close project and to save project in android studio  use the Save All option from the File>>Save All.

  Open Recent project in Android Studio:

Firstly, Click on File then Click on Open Recent and choose the file which file you want to be opened. I choose “MathGame” file.

1

After that a message box will be shown on your computer screen. This will show  project will be opened in “This Window” or “New Window”. I open the project in “This Window” and After that your project will be opened.

2

Close project in Android Studio:

To close project you need click ” File —> Close Project ” menu in top menu bar.

3

Save project in Android Studio:

To save project, you need to click ” File —> Save All ” menu in top menu bar or just click Ctrl+S.

4

To remove project completely from Android Studio, just to File->Close Project, then, in the “Welcome to Android Studio” window, you have an “x” right next to each project; just press it to remove it from the recents.

5

I hope you find this blog post very helpful while creating Android Project in Android Studio. Let me know in a comment if you have any questions regarding Android Studio. I will reply you ASAP.


Open Project in Android Studio

When a Android project is already present in your system then you can open it easily in Android Studio. Here we discuss several method  to open project in Android Studio.

Open Recent Project in Android Studio:

Firstly, open the Android Studio. You will see Welcome to Android Studio on your computer screen. You will also see it if you close your current project(s). After that we could open an existing android studio project in Android Studio from “Recent Projects” directly. Just click the file name in recent projects which you want to open.

1

Open Project Not Present In Recent Projects:

we could open an existing android studio project in Android Studio just clicking on “Open an existing Android Studio project”.

2

In the file dialog that appears, navigate into the project directory of the project. We located and selected “IndependenceDay” project and then Click OK.

3

From the file menu:

Click on File and then Click on Open.

g

To reopen other recent projects when a project is already opened in Android Studio. Go to File >> Open Recent >> Choose recent projects you want to open

6

I hope you find this blog post very helpful while creating Android Project in Android Studio. Let me know in a comment if you have any questions regarding Android Studio. I will reply you ASAP.