Tag Archives: Android Programming

Creating an App Icon with the Asset Studio

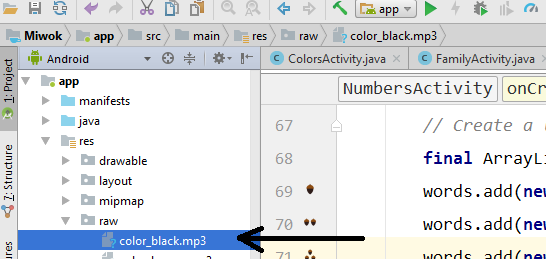
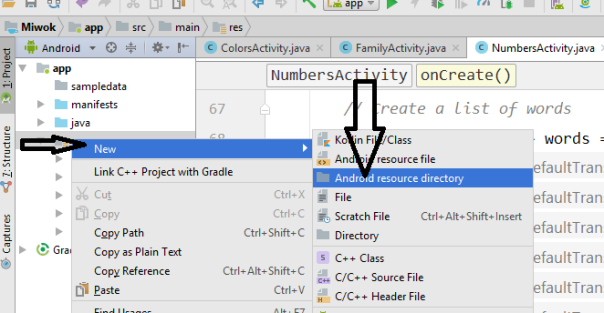
In this article, I will show you how to create the Android application icon with Assets Studio  in Android Studio. If you right-click over pretty much any directory in the Android Studio tree, the context menu will have an “Image Asset” option.

3.png

By default, the Asset Studio has its “Icon Type” drop-down set for “Launcher Icons(Adaptive and Legacy)”, “Lancher Icons(Legacy Only)”, “Action Bar and Tab Icons” and “Notification Icon”. The overall name for launcher icon is found in the Name field, above the tabs. The default is ic_launcher.

4

Create adaptive and legacy launcher icons


Note: If your app supports versions no higher than Android 7.1, follow the instructions to create a legacy launcher icon only instead.

After you open Image Asset Studio, you can add adaptive and legacy icons by following these steps:

  1. In the Icon Type field, select Launcher Icons (Adaptive & Legacy).
  2. In the Foreground Layer tab, select an Asset Type, and then specify the asset in the field underneath:
    • Select Image to specify the path for an image file.
    • Select Clip Art to specify an image from the material design icon set.
    • Select Text to specify a text string and select a font.
  3. In the Background Layer tab, select an Asset Type, and then specify the asset in the field underneath. You can either select a color or specify an image to use as the background layer.
  4. In the Legacy tab, review the default settings and confirm you want to generate legacy, round, and Google Play Store icons.
  5. Optionally change the name and display settings for each of the Foreground Layer and Background Layer tabs:
    • Name – If you don’t want to use the default name, type a new name. If that resource name already exists in the project, as indicated by an error at the bottom of the wizard, it’s overwritten. The name can contain lowercase characters, underscores, and digits only.
    • Trim – To adjust the margin between the icon graphic and border in the source asset, select Yes. This operation removes transparent space, while preserving the aspect ratio. To leave the source asset unchanged, select No.
    • Color – To change the color for a Clip Art or Text icon, click the field. In the Select Color dialog, specify a color and then click Choose. The new value appears in the field.
    • Resize – Use the slider to specify a scaling factor in percent to resize an Image, Clip Art, or Text icon. This control is disabled for the background layer when you specify a Color asset type.
  6. Click Next.
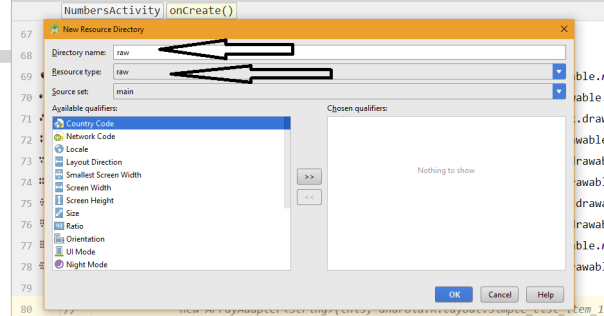
  7. Optionally, change the resource directory: Select the resource source set where you want to add the image asset: src/main/res, src/debug/res, src/release/res, or a custom source set.
  8. Click Finish. Image Asset Studio adds the images to the mipmap folders for the different densities.(Note Above description is taken from android studio documentation)

See below figure where I create a Text icon using Assets Studio.

5.png

NOTE: Same way we can create legacy launcher icon ,Action bar and tab icons and Notification icons.


Change Icon Of Android App In Android Studio

In this article, I will show you how to change the Android application icon using Android Studio. Icons are part of the graphical user Interface of the mobile application. In android studio there is a default icon set by android studio itself. You can change it as per your application requirement.


Changing the Application Icon In Android Studio:

Step 1- Open your application in Android Studio.
Step 2- Further follow the path to reach the desired folder to add icon i.e. app -> res-> mipmap.

1

Step 3- Here add you app icon. You can just simply copy and paste the image in mipmap folder.
Step 4- After placing the image in the mipmap folder. You need to rename the default icon name to your icon image name.
Step 5- Go to  app -> manifests open AndroidManifest.xml file. Here find the following code.
android:icon=”@mipmap/ic_launcher
Here ic_launcher is the default image name, rename it.

2

Also read: Creating an App Icon with the Asset Studio

Add Audio To App In Android Studio

Adding audio clip to android application is a simple task as it also add some further functionality. Here is a step by step tutorial how to add audio file and how to play music when App will start.


Adding Audio to app in Android Studio:

Step 1: Open the android studio with the project in which you want to add-on audio clip/media file.
Step 2: Create a raw folder.
Step 3: Add media file to raw folder by simply copy and paste that to raw folder.
3
Step 4: Here we added a media file “color_black.mp3” . Now open the Java File of desired activity, here we are adding audio in MainActivity.
Step 5: Further add this code

MediaPlayer mediaPlayer= MediaPlayer.create(MainActivity.this,R.raw.color_black);
        mediaPlayer.start();

Step 6: Now run the App and your music will play when App will start.

Create/Add Raw Folder In Android Studio

Raw folder in Android is used to keep mp3 or ogg audio files and also video files. The raw folder is created inside \app\src\main\res\raw. So we will simply create it inside res folder. Here is the simple way to create raw folder in android studio:


How To Create/Add Raw Folder In Android Studio

Step 1: Open App folder and select res folder

Step 2: Right click on res folder, select New> Android resource directory, then studio will open a dialog box and it will ask you to enter the name.

1

Step 3: Write “raw” and selectResource type” then click OK. Open res folder and you will find your raw folder under it.

2


Next Step: How To Add & Play Audio File In Raw Folder

JAVA For Android Developer– Tutorial, Examples, And Programs

Learn Android Programming – For Beginners To Pro

Android is the most popular open source operating system for mobile devices like Smartphone and Tablet. This OS is based on Linux kernel which is currently developed by Google. At Google I/O 2014, it was revealed that more than one billion per month people actively uses Android. As of July 2015, Statista revealed Google play is the largest mobile App store which has over 1.6 million Apps and billions of application gets downloaded every year. Android programming is based on Java programming language so if you have basic understanding on Java programming then it will be a fun to learn Android application development.


Prerequisite For Android Programming:

Before you begin Android programming below are the prerequisite needed:

JAVA:

Android programming is mostly done in JAVA language. So before you begin Android programming you must be comfortable with JAVA and OOPS concepts. If you are new to Android we recommend you to check out our JAVA for Android developer section where we have shared in-depth tutorial on JAVA.

XML:

Once you are done with JAVA the next thing you need is basic knowledge of XML for designing UI of Android App. Even though Android Studio has drag and drop for designing UI but still you will need to learn XML if you want your UI is highly user interactive. You can check out Design Android User Interface section to learn it.


Android Programming Tutorials:

Below are the list of Android programming topics. Follow the link to read full tutorial:

Topics (Follow the link to read tutorial) Description
Activity Lifecycle Learn about Android Activity lifecycle like created, started, resumed, paused, stopped or destroyed.
Intent Learn how Intent is used for communicating between the components of an Application and from one app to another
Shared Preference Learn how primitive data is saved on Android device based on key-value pair
JSON Parsing JSON stands for JavaScript Object Notation. It is structured, light weight, human readable and easy to parse. It’s a best alternative to XML when our android app needs to interchange data from server.
Toast & Custom Toast In Android, Toast is used to display information for a period of time. It contains a message to be displayed quickly and disappears after specified period of time.
Internal Storage In this tutorial we are going to learn about internal storage of data/files in Android App using example or you can say the primary memory of your phone.
External Storage In this tutorial we gonna study about storage of data/files in android external storage or you can say the secondary memory/SD card of your phone.
Sqlite SQLite is a Structure query base database, open source, light weight, no network access and standalone database. Android has built in SQLite database implementation.
AsyncTask In Android, AsyncTask (Asynchronous Task) allows us to run the instruction in the background and then synchronize again with our main thread.
Splash Screen Splash Screen is most commonly the first startup screen which appears when App is opened.
Volley Volley is a HTTP library developed by Google and was first introduced during Google I/O 2013. This library is used to transmit data over the network.
Retrofit Retrofit is a simple network library that used for network transactions. By using this library we can seamlessly capture JSON response from web service/web API.

 Android Material Design Tutorials With Examples

Android UI, Layout & Material Design Tutorial, With Examples

Creating an Android Virtual Device (AVD) in Android Studio

Android Material Design Tutorials With Examples

Capture

Material Design is a design language created for Google Android’s new OS which was announced in Summer 2014.  Since then it has become popular in designing and developing Android Apps. As per Google this language is based on paper and ink.

Android provides the following elements for you to build material design apps:

  • A new theme
  • New widgets for complex views
  • New APIs for custom shadows and animations

Here our in-depth tutorial will teach how to design beautiful and user friendly Application using Android Material Design. All our tutorial will have practical example and step by step explanation of each topic.


Prequisites For Leaning Android Material Design:

JAVA For Android Developer:

JAVA is a programming language which is most commonly used in Android App Development. Before you start learning Material Design you will need to learn Object Oriented Java. Check out our JAVA for Android Developer section to learn it.

Android UI Basics:

You will also need to be familiar with Android UI basics.

Android Studio:

Android Studio is the official IDE (integrated development environment) for developing Android Apps by Google. It is available for free download on Windows, Mac OS X and Linux.

Check out our Android Studio guide to get started with it.


Android Material Design Tutorials:

Below are the list of Material design topics. Follow the link to read full tutorial:

 
Topics (Follow the link to read tutorial) Description
TextInputLayout / Floating Labels in EditText TextInputLayout is a new element introduced in Design Support library to display the floating label in EditText.
TabLayout TabLayout provides horizontal layout to display tabs on the screen. We can display more screens in a single screen using tabs.
NavigationDrawer Navigation drawer is a side menu that helps us to organise the navigation inside our app. It is a uniform way to access different pages and information inside our app.
PercentRelativeLayout PercentRelativeLayout in Android is a subclass of RelativeLayout that supports percentage based margin and dimensions for Views(Button, TextView or any other view).
Toolbar In Android Toolbar is similar to an ActionBar(now called as App Bars). It is a Viewgroup that can be placed at anywhere in the Layout. We can easily replace an ActionBar with Toolbar.
PercentFrameLayout In Android PercentFrameLayout is a subclass of FrameLayout that supports percentage based margin and dimensions for Views(Button, TextView or any other view).
RecyclerView As ListView The RecyclerView is more flexible, powerful and a major enhancement over ListView.
RecyclerView As GridView The RecyclerView is more flexible, powerful and a major enhancement over GridView.
RecyclerView As StaggeredGrid It is used to show the items in staggered Grid (varying size)
CardView In Android, CardView is another main element that can represent the information in a card manner with a drop shadow called elevation and corner radius which looks consistent across the platform.
Pull To Refresh / SwipeRefreshLayout In Android App Pull To Refresh aka SwipeRefreshLayout is used whenever we need to refresh the content’s of a view via a vertical swipe gesture.
ViewPager ViewPager in Android is a class that allows the user to flip left and right through pages of data. This class provides the functionality to flip pages in app.
Animation The Animations Framework allows us to create visually attractive animations and transitions in our apps.

Creating an Android Virtual Device (AVD) in Android Studio

An Android Virtual Device (AVD) is a configuration that defines the characteristics of an Android phone, tablet, Android Wear, or Android TV device that you want to simulate in the Android Emulator. Before debugging and testing android application, you should create an android virtual device ( AVD ) to start a simulator. You can specify special configurations for your avd, and then start it for debugging and executing applications.

To create a new AVD, do one of the following:

  • Select Tools > Android > AVD Manager.
  • Click AVD Manager AVD Manager icon in the toolbar.

Both will Open the AVD Manager shown in figure below:

1

OR

2

Android Virtual Device Manager will be opened. After that Click on Create Virtual Device.

3

Now choose the Category, phone size and choose the pixels according to your requirement. After this click on Next button.

4

After that choose the SDK Version and Click on Next button. If you have various SDK Versions like Kitkat, Lolipop ,Marshmallow,Nougat and Oreo etc in your SDK then you can select one of them. Here we choose Nougat SDK Version. Click on the next.

5

After that Enter the AVD Name in Android Virtual Device and Click on Finish button. Here you can do customization to AVD which you are creating as per your requirement.

Click Finish and new AVD is created. To start it, click the green triangle button in AVD list Actions column. To edit it’s settings, click the green pencil button.

6

AVD will start in Emulator. Now you can run your App in this AVD.

emulator2

I hope you find this blog post very helpful while creating AVD in Android Studio. Let me know in a comment if you have any questions regarding Android Studio. I will reply you ASAP.


Add/Create New Java Class in Android Studio

What is Java Class ?

A class is nothing but a blueprint or a template for creating different objects which defines its properties and behaviors. Java class objects exhibit the properties and behaviors defined by its class. A class can contain fields and methods to describe the behavior of an object.

Android Studio helps you to quickly create the following new classes and types:

  • Java classes
  • Enumeration and singleton classes
  • Interface and annotation types

Step 1:  Firstly, Select app > Java > package > Right Click on package. After that Click on New > Java Class.

1

Step 2: After that Enter Class name and Click on OK. Here we create Class Bird as shown in figure below. Remember to choose your package in which you want to create new class. There are many options available fill as your requirement.

2

New Java Class will be created in your Android project.

3


I hope you find this blog post very helpful while creating Android Project in Android Studio. Let me know in a comment if you have any questions regarding Android Studio. I will reply you ASAP.

Create/Start New Project In Android Studio

Objective:

The main objective of this tutorial is how to create a new project in Android Studio. And this tutorial is for those who are new to Android Studio.

To create a new project perform the following steps:

Step 1: Start and configure the project:

Firstly, open the Android Studio. You will see “Welcome to Android Studio” on your computer screen. After that you click on “Start a new Android Studio project”.

ff

If you do have a project opened, click File > New > New Project.

aa

After that you will see “Create Android Project” on your computer screen. Here enter the “Application name” , the “Company Domain” ( Company domain is used to uniquely identify the App. So two App with same Application name will have different company domain. e.g. I used here “sanikamal.ruatech.com”)and the project location in the text box and then Click Next button. If you want to use C++ and/or Kotlin code in your project, check the corresponding checkboxes to set up your project accordingly. You can always add C++ code and add Kotlin code later.

ffg

Step 2: Select form factors and API level:

After that you will see “Target Android Devices” on your computer screen and select the form factors your app will be run on. Select “Phone and Tablet” field and enter the “Minimum SDK” in the text box and then Click Next button. When you select Minimum SDK, Android studio will give you some active android devices percentage that will support your android application. Otherwise, you can also click on “Help me choose” button for more information about android platform versions.

ggg

Step 3: Add an activity:

This screen suggests you “Add an Activity to Mobile” first. If you don’t want to add any activity at starting, you can select Add no activity option. We selected Empty Activity.

If you have selected Phone and Tablet in option in the last screen then it will display the only phone related suggestions.

For example, select Google Maps Activity for google map project, Login Activity for User Login project etc.

bbbbb

Step 4: Configure your activity:

Here, you can customize your selected activity. You can change your Activity name from here. Enter the “Activity Name” in the text box and enter the “Layout Name” in the text box and then Click Finish button.

Activity Name Name of JAVA file for programming

Layout Name Name of XML file for designing UI

swsw

Android Studio now sets up your project and opens the IDE.

fgggjh

I hope you find this blog post very helpful while creating Android Project in Android Studio. Let me know in a comment if you have any questions regarding Android Studio. I will reply you ASAP.